Complex ocean water
Introduction
Ocean water has several phenomena which are hard to simulate. There are different types of waves:
- Surging breakers roll onto steep beaches
- Plunging Breakers form tunnels if the beach slope is moderately steep
- Spilling breakers generate foam on gentle sloping beaches
About different types of ocean waves check the Science & Technology Focus homepage.
Although, the Navier-Stokes equations can handle all the different wave formations, their computational expense is huge. The other approaches discussed in earlier chapters can’t really handle different type of waves, and the height-field representation has several limitation also.
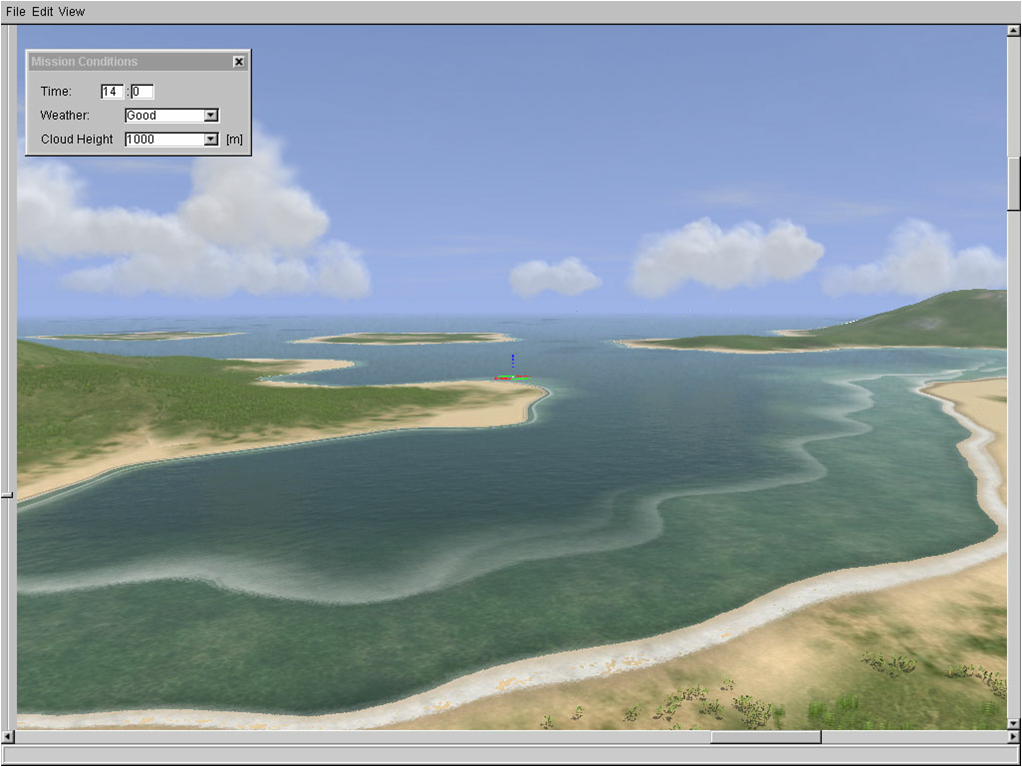
In the first part of this chapter, I introudce here briefly the main characteristics of an ocean water shader, published by [KRI]. In the second part, I descuss my demo application which focuses on the most difficult part of the ocean water shaders: wavy beaches. The result will be something like on this screenshots:


Of course, these two screenshots are made on the same beach. 🙂 Only some adjustments are made to look somehow different.
Water Shader in WWII Online: Battleground Europe
[KRI] published a complex water rendering approach, which was used in the game WWII:online as well. The presentation can be listened on-line here (in Russian). The bases of a their water shader is a general illumination equation, like the ones discussed in the Water mathematics chapter. Ambient light, diffuse light and also specular lights are taken into account. The Fresnel term is approximated with the cheapest method discussed in Alternative solutions: Simpler solution. The following screen-shot visualizes the result:
Optimizations
Using approximations and heuristics were applied in their water shader to get higher framerates. They used the following general ideas:
- Using cheaper calculations instead of most accureate ones.
- Refreshing the reflection map only a few times in a second. (This can result artifacts when the movement is too fast.
- Optimizing the shader code with different compilers.
These optimizations are needed to render real-time and visually convincing water surface. Although, the list contains geneal ideas only, they are useful for every computationally complex scene. The details of the approaches need to be adjusted to the required results.
Combining layers
To get a realistic result, several different technique is combined. There are areas of water and land, but the border between them is much more complex. There is a wavy area around the coast – waves are going towards the beach. Where the water is shallow caustics are also visible. Finally, there is a zone, where the waves run out over the sand.

For a complex water-shader, the alternatives must be chosen after exhaustive consideration. The deepness of water, the viewing angles, the viewing distances and the length of waves are just some of the factors, which needs to be taken into account.
Coastal wave formation
In their approach complex mathematical equations are used to determine the wave formations. The waves need to go towards the beach, and their sinusoidal shape are displaced by functions depending on horizontal coordinates, time and on an extra variable which influences the shape like weather conditions. For more detailed explanations and mathematical background, see [KRI]. The next figure shows their wave-formation:

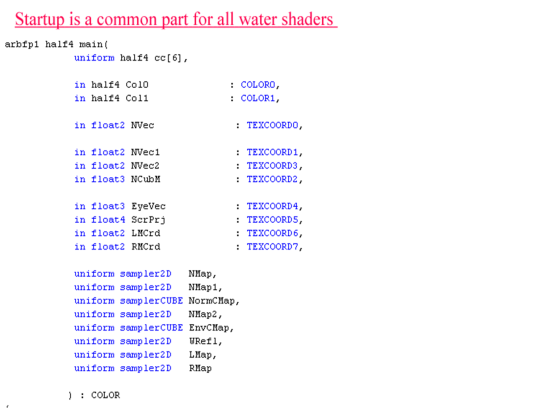
HLSL code
Their shader code differentiates the wave types. After the common variable declaration in the first part, they use 20 GPU instructions to calculate the reflections by a cube map, to compute the Fresnel term and the fog effect in the next section. They also use pre-generated normalvector-map to gain performance. The third part in their shader code calculates the appearance of high quality water. 55 instructions are needed to compute the permutate the original texture coordinates, determine the normal vectors, weather conditions, and reflected color. Cloud shadow and foam texture is added to the result as well. The amount of foam is computed by a separate function. These parts are visualized on the next figures:


Ocean Shader Demo Application
Introduction
To be able the demonstrate the differences between DirectX SDK version, I chose today’s latest DirectX SDK instead of XNA Development Kit. There exist different functions, different classes and the entire development needs different approaches in these two development framework.
In XNA we use instances of the Model class to handle an objects which needs to be rendered, while in DirectX SDK the Mesh class is used for the same purpose. The Model class is more complex, various Mesh levels can be handled by it together, but in the DirectX SDK there exist several functions to create an object and its properties, while in XNA we can only import models or directly determine the attributes of the model one by one. Because of this, it is more comfortable to work with the DirectX SDK now, but XNA will easily replace the support for managed development of the DirectX Development Kit later.
In this demo application I demonstrate the steps to create a beach with waves. The main goals are:
- Creating waves by vertex shader which are going towards the beach
- Applying some other compounds sinusoidal waves to distort the regular wave shapes
- Adjusting the wave speed, colors, daytime, reflectance etc. by user input.
- Adding some foam texture for more realistic result
Different approaches are needed to handle spray, godrays, exact water color etc, they are out of the scope of this demo application. For specific purposes, the techniques discussed in chapter Water Mathematics can be added get more realistic scenes, but they need always be fine tuned not to destroy the other effects.
Vertices of the water surface
I created the vertices of the water surface according to the chapter LOD algorithms on water surfaces. The grid is always placed in front of the camera to cover only the necessary part of the scene. The performance profit is enormous, the experimented with huge grid sizes, for example in the final version I use 100 x 100 = 10000 vertices. This size can be handled real-time, but actually I don’t render any unnecessary objects, the GPU works only on my water surface. The latest graphic cards are much faster than the one I use for development (Ati Radeon 9600), but generally other elements are also calculated and rendered not only the ones which are important for the water surface. The optimal size of the grid always depends on the target hardware and on the expected realism.
The approach discussed in [BMELAB2] determines the horizontal place of the vertices relative to the camera only once at the beginning. This means that if we change the angles between the camera and the water surface, we can extend the visible area to places which are not covered by the grid. This can be avoided by application of projected girds as the chapter “Using projected girds” describes. The demo application for that technique is also available on-line, I don’t need to demonstrate the same approach in my application. I simply don’t allow to change the angle between the camera and the grid to handle this problem.
The place of the vertexes are determined (also based on the equations described in the chapter LOD algorithms on water surfaces) by this lines of code to conform the window size, aspect ratio and the size of the sky-dome as well:
float aspectRatio = Camera.AspectRatio*1.55f;
float d = 4000f / (nx – 1.0f) * (1.0f / (1.0f – (float)i / nx) – 1.0f);
Vector3 pos = new Vector3(d, aspectRatio * d * (float)(j – (ny – 1) / 2f) / ny, 0);
return (object)new CustomVertex.PositionOnly(pos);
The aspect ratio determines the distance between the vertices across the viewing direction, while the variable d helps to determine to coordinates along the viewing direction to cover equal size by the triangles on the final picture.
Finally, to get the expected result, the water is rendered always into the front of the camera. The camera directions form a vector which is used to generate an inverse of the camera matrix. This inverse is used to transform the place of the water grid always according to the place of the camera:
Vector3 pos = new Vector3(Camera.Position.X, Camera.Position.Y, 0);
Vector3 dir = Vector3.TransformCoordinate(
new Vector3(Camera.Direction.X, Camera.Direction.Y, 0), Matrix.RotationZ((float)Math.PI / 2));
Game.Device.Transform.World = Matrix.Invert(Matrix.LookAtLH(pos, pos + new Vector3(0, 0, 1), dir));
The result can be seen on the next figures:

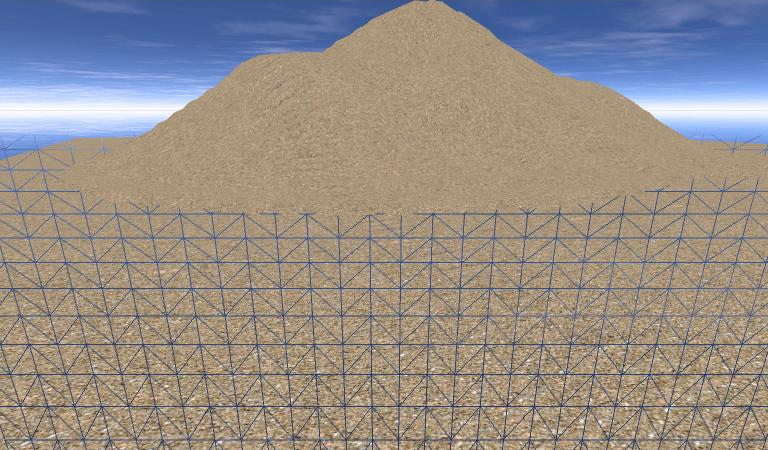
The figure on the left shows the alignment of the triangles which are in use on the right figure.
Waves – Getting everything in motion
The vertical place of the grid elements is determined by the vertex shader. It does not change the horizontal places, only by changing the Z coordinates are the waves formed. The tricky part is the equations of the displacement. Although there are complex frequency filtering techniques which can be used to generate waves going always towards the beach, they are out of the scope of this paper. I used an easier approach: my island is almost circle shaped, and I generate dominant radial waves going towards the centre of the beach. This resembles the nature waves, which are generally going towards the dry-land.
The dominant radial waves are going to a center point which changes with the size of the island. The phase of the waves depends on the distance from the center point, and on two other variables influencing the space frequency and the time frequency of the waves.
//radial waves
float distance = length(float2(pPos.x-64*xIslandScale,pPos.y-64*xIslandScale));
float Phase = distance * -rSpaceFreq + Time * 2 * -TimeFreq;
The height of the vertices is calculated by certain power of sinusoidal waves, which results steep waves on both sides. To reduce the slope on the back side of the waves, the amplitudes are reduced depending on the wave phase (if the product of the sine and cosine of the phase is less than 0, we are on the back side of the wave). To avoid negative waves the sine function is clamped to have only positive values. A correction term is also modifying the final result to allow the user adjusting the water height:
//Calculating waveheight
float Cos,Sin;
int power = 7;
sincos(Phase,Sin,Cos);
float temp2 = 1;
if (Cos*Sin < 0) temp2 = 2;
float WaveHeight = clamp(pow(Sin,power)*rAmplitudes*temp2-(rAmplitudes*(temp2-1)),0,rAmplitudes) + (xIslandScale*128-distance)/xWaterSlope/2+xWaterLevel;
At this point we have absolutely regular waves going towards the centre point of the island, but we need to add some smaller going in different directions to have a more realistic result. I add four waves with different amplitudes and phases going in different direction to simulate the random-like waves of natural water surfaces. The four waves can be handled together as a vector (float4). As we always need to perform the same operations on them, it is the same efficient to use calculate the effect of one wave as four of them. We can calculate the height of the sum of four sinusoidal waves with the following lines (the wave directions and the frequencies are vectors with four elements):
//calculating the correction
float4 crrectionPhase = (WaveDirX * pPos.x + WaveDirY * pPos.y) * SpaceFreq + 10 * Time * TimeFreq;
float4 cCos,cSin;
sincos(crrectionPhase,cSin,cCos);
float correctionHeight = dot(cSin,Amplitudes/2);
We need to add this correction term to the wave height and calculate the normal vectors to allow nice visual effects applied in the pixel shader. The screen-shot of the result is visulaized on the next figure:
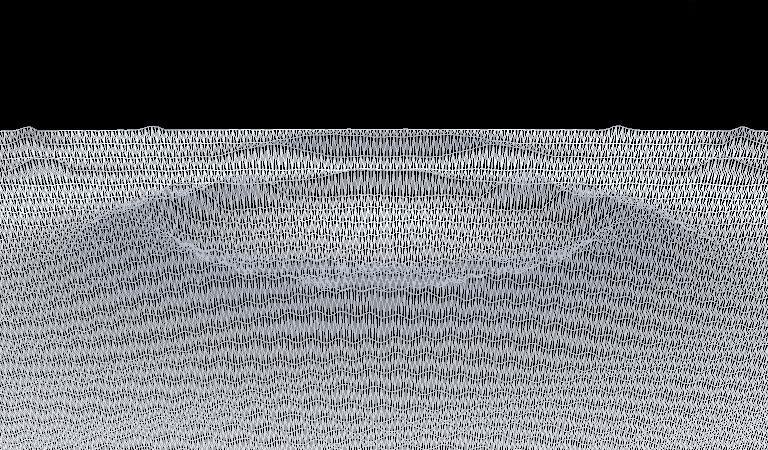
Note that the image shows the center point of the waves. The radial waves are the most significant; the other waves only influence the locel view – the pattern of the surface from this distance.
Some video demonstration:
Optical effects
Reflection is one of the most significant optical effects needed to render ocean surfaces as well. I tried two different method, rendering reflection using cube-maps and applying the same technique as in the lake-water shader. Like reflection maps, refraction-maps are pre-generated in a separate rendering phase.
// REFLECTIVE AND REFRACTIVE COLORS
float2 RefractionSampleTexCoords;
RefractionSampleTexCoords.x = IN.RefractionMapSamplingPos.x/IN.RefractionMapSamplingPos.w/2.0f + 0.5f;
RefractionSampleTexCoords.y = -IN.RefractionMapSamplingPos.y/IN.RefractionMapSamplingPos.w/2.0f + 0.5f;
float4 refractiveColor = tex2D(RefractionTextureSampler, RefractionSampleTexCoords-newNormal*0.2f);
float4 reflectiveColor = tex2D(ReflectionTextureSampler, RefractionSampleTexCoords-newNormal*0.2f);
The normal vectors of the triangles are distorted by a bump-map to have more random surface normals, like water surfaces have.
float3 normal = tex2D(BumpMapSampler,IN.texCoord0.xy)* 2.0 – 1.0 + float3(0,0,7);
float3 newNormal = normalize(IN.norm + normal*10);
Using this normal vector, ambient and specular light are also calculated:
//lighting factor computation
float3 LightDirection = normalize(float3(-13,-2,4));
float lightingFactor = 1;
if (xEnableLighting)
lightingFactor = saturate(saturate(dot(IN.norm, LightDirection)) + xAmbient); //newNormal volt
// SPECULAR LIGHT
float3 lightDir = normalize(float3(3,12,4));
float3 eyeVector = normalize(IN.Position3D.xyz-EyePos.xyz);
float3 halfVector = normalize(lightDir + eyeVector);
float temp = 0;
temp = pow(dot(halfVector,newNormal),30);
float3 specColor = float3(0.98,0.97,0.7)*temp;
Some dull color depending on the wave phase influences the final result to have more realistic result:
// ADDING DULL COLOR
float3 dullColor = float3(0.1,0.25,0.5);
//float dullFactor = 0.2f;
//INFLUENCED BY AN IMPUT VARIABLE
float dullFactor = xDullFactor;
dullFactor = saturate(dullFactor * (1+IN.phase*IN.phase*IN.phase*IN.phase));
finalColor = finalColor *(1 – dullFactor) + dullColor *dullFactor;
Summary
The main ideas of wave rendering were introduced in this chapter. Every piece of the jigsaw need to be carefully planned, otherwise they can negatively influence other elements. If you try to handle everything generally, you can have less convincing visual results, like me. Absolutely realistic beaches can be rendered, only the target hardware and performance can limit the possible approaches. The technique discussed here can be basis for several kind of realistic water rendering methods, and can be improved in every direction depending on the expected result. Particle systems, horizontal displacements, wave deformation, animated textures are just some of the ideas for possible improvements. The full shader code can be found in Appendix E – Ocean Shader Code of the Demo Application.

Hello. My name is Piotr. I’m student from Poland and I’m fighting a little with XNA:). I have few questions to you.
Is it possible to download Ocean Shader Demo Application with source code? Because I was trying to use shader code above to generate in vertex shader waves. But it needs a lot of variables to initialize on start and I haven’t idea how to set up them.
Kind Regards Peter
Is it also possible to take wave hight at position? Tu update object position to current wave height?
Piotr/Peter
July 16, 2008
My “ocean wave shader” is run by managed DirectX and not by XNA. When I started writing it the XNA version 2.0 did not exist. I had several difficulties which were easy to solve under normal DirectX (for example to create a simple mesh by the function Mesh.sphere()). Finally, I decided to use the latest DirectX verison.
The source code of the application:
http://rapidshare.com/files/125960765/ocean_water.rar.html
The source needs ‘Visual Studio 2005′ and ‘.Net framework 2.0′ to run.
————-
In XNA you can set up shader variables like this:
// variable definition
private Texture2D sandTexture;
// setting the variable by loading an outer file
sandTexture = content.Load(”sand”);
// setting the xSandTexture shader variable to the value of sandTexture
effect.Parameters[“xSandTexture”].SetValue(sandTexture);
————
As homework I also made a ship floating and moving on the water. The general physics were something like this:
There are 5 vertices with the properties of speed and coordinates.
4 vertices on the 4 corners of the ship, and 1 in the middle of the back side at some lower height as an engine.
The physical forces are effecting the 4 corner vertices: the gravity pushes down, the water upwards (if the vertex is underwater), and if the vertex is underwater some force decreases its speed. You can add the other forces to the engine-vertex to be able to control the ship. This makes the front of the boot going up if you accelerate and going down if you decelerate.
And to hold the ship (the vertices) together you can add other constraints: the space between tha vertices is limited. For example you can replace each vertex according to the coordinates of the other vertices in more iteration so they move always together.
To be able to calculate game physics in the CPU you need to simulate the waves in the CPU as well. In the GPU you have thouseands of vertices, but they are always transformed and don’t need to be at the place of any other object. To determine the wave height, for example, to move a boot, you need to calculate the same function in the CPU for our 4 corner vertices as in the vertex shader for the water surface. This way the calculations are not approximations and the object can be outside the visible area (our water vertices are transformed to be always on screen).
Habib
July 17, 2008
Very nice approach dude. I will give it a try today. I was looking for information about the different layers the water should be divided like you did (with coastal area and the bumpy area) finally here is a good explanation
Dimi
July 13, 2009
Be aware that you can find two shader description on this page. I am moving my blog to a wiki page, they can be more distinguishable over there:
http://habib.wikidot.com/ocean-shader-kri
– This is a summary of 3rd party papers describing the water shader of the game WWII Online: Battleground Europe. Unfortunately, I don’t have any other source or resource for this aproach.
http://habib.wikidot.com/complex-ocean
– This shader focuses on the wave formation, the other phenomena are not so detailed. I did not have enough time to work on the reflections and other factors. But for this, I have the source and the full shader code. I am updating it, too, for the wiki page.
I would be really glad if you could share your experiences and opinion of the pages, or perhaps your version of the shader. Any feedback would be really useful!
Thanks, and good luck with the water shaders!
Habib
Habib
July 13, 2009
HI!
My name is Anderson,
am a student of XNA, I’m looking for an engine
simulation of waves on the beach, crashing on the beach,
to develop a simulation project,
I was attracted by the example of your site,
I downloaded the sample file but it is generating
an error in class MainForm.CS on line 24:
Game.Init (this);
Error generated: FileNotFoundException, is not a valid win32 application.
I’m using XNA 3.1 with VS2008EXPRESS.
I wonder if you can help me or send a sample that
generate error if possible please.
After my study I report the results and put you to view.
Sorry translations because I’m from Brazil, my English is not very good.
My email is alves.anderson @ gmail.com
Greeting
And thank you in advance for return.
Good night!
Anderson
March 21, 2010
The time I started dealing with water shaders there were only the first versions of XNA available (perhaps v1.0), and to be honest those versions were really far from the later ones. You will need several changes to be able the use the code with XNA 3.1.
E.g.: function signatures have changed, I am pretty sure.
If the error is caused by the line
Game.Init (this);
I guess it is a change in XNA, and you can find out how the main loop should be started by just checking the empty game project examples of XNA 3.1
I had some minor updates no the wiki site (http://habib.wikidot.com/) and corrected the source as well. I suggest you to check the downloadable files over there, I tried to update, correct and explain the source.
I think your best shot would read the code and the description of the shaders and re-develop the ideas the way you require them.
Unfortunately, I wont have time to continue working with water shaders, but if you have questions I will try to help!
Good luck!
Habib
March 21, 2010